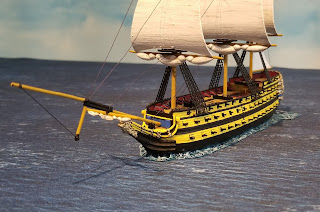
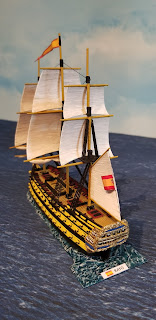
Alas, the first ship I plucked out of the pile is the Spanish 1st rate ship Rayo (100 guns). This is among the largest ships for the battle. However, while most of the ships are 3rd rate (74 gun), the length isn't that much shorter than the Rayo ... they just generally have fewer decks.
All ships are 1/300 scale (6mm) from Old Glory Miniatures.
So, what approach was used for this ship that will make all that come after it easier? Read on ...
 |
| The Spanish 1st Rate - Rayo (Painted by Jay White) |
The first is that the masts and sails are 3D printed (see STL file picture below). If I didn't have these, I'd be spending hours assembling masts and doing sails. Now, I just print them off and paint them up separately (takes about 15-20 minutes per mast - that includes the sails) - then, glue them into the holes and presto ... hours upon hours saved just right there! Also, the plastic (PLA) used to print the sails is extremely durable when it comes to accidental touches ... very forgiving where the metal is very much not.
But wait ... there's more!
 |
| 3D printed sails. |
 |
| A closer look at the rigging. |
The rat lines are easy, I used the metal ones that come with the ship. The most excellent Adam Clark has laser cut them out of a black rubber ... which once again leverages the miracles of technology to make something that is more durable and doesn't even need to be painted! While he has shipped me some, they have not arrived ... so for now I'm using the metal ones ... which honestly are not bad at all (just spray black, cut them down and bam!).
 |
| Sailing away. |
For the base I used 1mm plasticard. The back of the base is square so that the ship can use the turning template and straight line measurement can be carried out. The rest of the base is just irregularly formed around the hull of the ship. I used Woodland Scenics water effects for the water texture. I also used the water effects to hold the name plate in place for the back of the base. Once dry it holds it just like glue.
 |
| Look out - it's coming right for us! |
Painting the sails is easy. I base spray the 3D printed masts with Zandri Dust from GW. After painting the masts (GW Zemesi Desert and Black), I use a flattened out medium tank brush (I cut the tip off to give the end of the brush a square shape) and streak the white across the sail horizontally ... following the shape of the sail. I just keep building up the streaks until I get a nice texture, with some of the Zandri Dust base coat showing through.
But the Old Glory ships don't come with gun ports --- only the cannon barrels? Yes, that is true. I 3D printed gun ports! You can see them in the picture above lining the sides of the ship. The plastic ends up holding the metal barrels really well ... very solid.
 |
| 3D printed gun ports. At 6mm, they are tiny ... I wasn't able to get the gun barrel included. But, no worries, the metal ones actually work really well on them. |
 |
| Ship with gun ports installed ... I put the barrels on later. |
I did up a sheet of my own flags and streaming pennants for the Spanish and French (will do the British shortly). Gotta have flags!
 |
| The Spanish pennant steams in the wind. |
The deck was easy. Base coat of Zemesi Desert, Sepia wash, then a drybrush of 50/50 Zemesi Desert and Screaming Skull.
 |
| Closer view of the name plate. |
A tip my buddy Roy picked up on the rigging. Don't use cotton thread, instead buy viskose thread as it lasts much longer and is more durable. I didn't go crazy with the rigging ... really just did a very basic set of it but it adds to the overall effect.
 |
| Side view showing the rigging lines. |
So there you have it - the first of the Spanish fleet. My next ship is a French 3rd rate (74 gun). I expect this ship to go much faster now that I've figured everything out. I also have finished the first revision of the rules and will post those up for those that are curious in a separate post. I've called the rules "Beat to Quarters!"
Stay tuned!


Looks fantastic!
ReplyDeleteThanks! :-)
DeleteShip looks great Jay. Being ‘at quarters’ is a fun touch. That 3D printer is sure paying off. That Ship is big enough to put little 6mm sailors on!
ReplyDeleteI’ve used cotton thread stiffened with glue for my rigging and seems to work well enough. Just cut to the proper length and glue on. Did you have to tie the rigging knots?
Looking forward to seeing more ships! 😀
Thanks Stew! Yes, I tied the rigging lines and just used a spot of super glue on the knots ... didn't take long at all ... rigging is much easier to do on 1:300 scale ships than 1:1200 :-)
DeleteVery nice Jay! The ship turned out really good. Those 3D gunports are impressive. 69 more to go 🤔
ReplyDeleteVol
Lol! I'm just doing the Spanish and French ... my buddy Roy is covering the British ... so just 30ish to go ... lol
Delete